Even if you choose the best rifle scope on the market, the optic is useless if you don’t know how to use it properly.
If you want to shoot with efficiency and precision, you’ll need to learn how to adjust your riflescope.
Interested? Let’s get started!
Mounting your scope
There are three main areas to explore in order to properly mount your scope on the rifle:
- The height of your scope
- The forward/rear position of your scope
- The level of your scope
Some shooters prefer to have a professional gunsmith mount a scope, but you can mount it yourself so long as you carefully follow this guide.
Let’s begin with your scope height…
Eye box
Adjusting the scope to the proper height brings your eye in the “eye box” and makes shooting comfortable.
Lay the full weight of your head on your cheek rest and close your eyes. Once you’re comfortable, open your eyes.

Can you see through the scope?

If your answer is no, then you have to change the height of your scope.
You can buy replacement mounting rings that are either taller or shorter. If you like switching optics often, get one of the best quick detach scope mounts.
You can also buy a cheek riser or add layers of insulation underneath to your rifle stock to get your cheek higher:

- Tool-less clip-on cheek risers for the MOE Stocks
- Gives the user the option to raise the cheek weld .25, .50, or .75 inch in height
I know you’re thinking: why do I need to worry when I can just lift my head up?
Frankly, you’ll end up with a tired neck and fatigue.
Having the scope as close to the barrel as possible helps with cheek weld and reduces accuracy problems due to canting and POI/POA variance.

But: make sure your scope doesn’t sit too low. If you’re looking up through the corner of your eye to the point where your glasses or contacts get blurry, that’s your sign.

On that note:
If you have an AR-15 A2, you might find that the scope sits low enough but the front iron sight will block the view. Instead of getting higher rings, go check out my AR-15 A2 front sight removal guide.
Eye relief
Adjusting the scope forward and back brings your eye to the correct “eye relief”.

Eye relief is the distance from the ocular lens to your eye.

Why is that important?
If your scope is too close, you’ll end up smacking yourself on the eyebrow due to firearm recoil. This is commonly referred to as “scope bite” or in simpler terms— a black eye.
In order to get the correct eye relief:
- Set your scope loosely on the rings so you can make adjustments.
- Place your rifle on a stable platform and position yourself comfortably.
- Move your scope back until a black ring starts to show in the outside of the scope’s view. Then move it forward until the black ring disappears.
- Keep repeating this process until you get the scope to the position where you can see a complete field of view without any black rings or dark spots.
If you need to move the objective lens further back and you already have the rings as far back as they can go, you can purchase a cantilever mount to get you a little further.
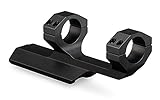
- Use this cantilever mount for mounting 1-inch telescopic sights
- The 2-inch offset of this cantilever mount positions the scope in a forward location, allowing the correct eye relief and head placement
When I shop around for scopes, I look for at least 4” of eye relief from the scope’s eyepiece— like the Leupold Rifleman 4-12×40.
Leveling
Leveling a scope is an easy but critical step to take.

Why?
An unlevel scope can cause diagonal or dislocated windage and elevation adjustments.

Also, if your reticle has a BDC ladder, hash marks, or a rangefinder, those features will not help if your scope isn’t level.

I highly recommend using a bubble level or a scope leveler kit. Here’s what I use:

- DIMENSIONS: 13.6 inches L x 10.3 inches W x 3.4 inches H
- EASE OF USE: Securing fasteners properly is critical to accuracy, the Wheeler F.A.T. Wrench makes it easy
You simply place it between the flat spot underneath the turret adjustments and the rail— and you’ll be set.

Eyepiece Focus
Have you ever caught yourself with either a clear reticle and blurry target or a clear target and blurry reticle?

That’s the symptom of an incorrectly focused eyepiece— a common mistake with a new rifle shooter.
Thankfully, I’m going to show you the correct way!
Crank the ocular lens all the way to one end. This will make the reticle blurry, don’t panic. While in your shooting position, slowly turn it the other way until you’re at the spot where it gets sharper and starts getting blurred again.
Continue turning it back and forth using minor adjustments until you find the “sweet spot”.
You can also get a scope with a fast focus eyepiece like the Vortex Viper HS 4-16×50 for quick and easy reticle focusing.
How to Adjust a Rifle Scope
Zeroing ensures that the point of aim (POA) with the scope is the same point of impact (POI) on the target.

When a new scope is properly mounted on a rifle, it must be “zeroed.” This entails that the scope adjusts so that the center line of the reticle appears precisely with where the bullets hit.

There are two adjustments needed to zero in your scope: elevation and windage. These adjustments are usually measured in MOA or MIL/MRAD.
Let’s start with elevation adjustment…
Adjusting Elevation
Adjusting the elevation turret allows you to change the vertical impact of the bullet relative to where you’re aiming with your scope.

You can turn the top turret either clockwise or counterclockwise for up and down adjustments, respectively.
Each “click” of the turret corresponds to an angular measurement— depending on your scope’s specifications. For example: 1/4 MOA adjustments equal to 1/4″ per 100 yds.

If you’re shooting too low, raise the reticle up to meet the point of impact. If you’re shooting too high, lower the reticle down to meet the point of impact.
Adjusting Windage
Adjusting your windage turret allows you to change the horizontal path (left/right) of the bullet.

Depending on the distance, wind can have quite a bit of impact on the bullet trajectory.

For windage, turn the side turret either forward or backward for left and right adjustments, respectively.

Many shooters find it easier to work with holdover points on the reticle to compensate for wind.

But, you can also use a smartphone app and manually enter wind speed and direction relative to the shot. You should get a windage adjustment solution.
For more information on how to sight in a riflescope, go check out this quick guide.
Other corrections
Parallax
If the reticle changes position on the target when you move your head or shift your gaze, your parallax is not properly compensated for at that range.

Scopes that don’t come with parallax adjustment features are going to be factory-set to be parallax free at a specific distance. Within that distance, you won’t have issues.
In other models, parallax adjustment can be found on the left side by the elevation and windage turrets or via an adjustable objective.

It’ll take a little bit of playing around. When the image is crisp and sharp without any crosshair travel, you’ll know you’re parallax free.
Magnification
Scope magnification is a multiplication measurement in contrast to the average naked eye.

Here’s a quick example:
With the Vortex Diamondback 4-12x40mm, the 4x means that the image you see through the scope appears four times closer than it does with your naked eye. This variable scope allows you to change the magnification of the scope from 4 to 12, stopping anywhere in between.
You can adjust the magnification by simply turning the dial to the magnification you desire.

Conclusion
In order to get the full power and versatility of your riflescope, you’ll need to learn how to adjust it. I hope that you found this guide beneficial.
Now, head to the range and give it your best shot!
FAQ:
How does a rifle scope adjustment work?
A bullet’s trajectory is not a straight line. Depending on where the bullet hits, it may appear lower or higher, or to the left or right compared to what you’re expecting. Modern rifle scopes adjust for point-of-impact by adjusting windage and elevation turrets inside the sight picture. Along with that, further scope adjustments are helpful to shoot accurately with precision and overall comfort. You can find all the information needed in this epic guide.
What is scope parallax adjustment?
The purpose for parallax adjustment is to make sure your rifle scope reticle appears on the same focal plane as your target image. Without it, you’ll see unwanted movement or crosshair travel when you move your head and eyes in a different position. This leads to eye strain, inaccurate shots, and even target confusion for inexperienced shooters. Note that this only applies to rifle scopes. Red dot sights — like the EOTECH EXPS 2 or 3 — are “parallax free” devices at all distances.
Which way do I turn my rifle scope?
Here’s a helpful trick: You can think of the turret as a screw. Unscrew counterclockwise to raise it “up”. Conversely, turn it clockwise to lower the screw “down”.
What are the adjustment knobs on the top and side of the scope called?
Adjustment knobs on a rifle scope are called turrets. The top turret is to adjust elevation while the side turret is for windage adjustments.
What is the difference between First Focal Plane and Second Focal Plane scopes?
For FFP scopes, the reticle increases in size proportionate to the target image. With SFP scopes, the reticle remains exactly the same size throughout the magnification range. For more details, check out my First Focal Plane vs Second Focal Plane guide.


Fantastic
does the adjustment on the scope move the crosshairs or the impact. in other words if you turn the elevation in the up direction, are you moving the crosshair up or the impact of the bullet up.
An elevation adjustment moves your point of aim to your point of impact so they are now equal.
That way when you move your point of aim to the correct spot you also move your point of impact there as well.
The article, at the time of my reading stated: “If you’re shooting too low, raise the reticle up to meet the point of impact. If you’re shooting too high, lower the reticle down to meet the point of impact.”
This is completely backwards. If you shoot “too low” you need to LOWER the reticle to match your Point Of Impact. That will result in lifting the barrel to bring the reticle back on target and therefore raising the POI. To achieve that, one would use the “UP” adjustment of the reticle. The “UP” direction does NOT move the reticle UP. It moves the POI up, as explained above.
In short the reticle directions are steering the POI, not the reticle, which moves in the opposite direction.
Confusing isn’t it. Up moves the reticule up. So to increase range turn clockwise this will move the reticule down. To decrease range turn anticlockwise this will move the reticule up
Not very good. Why, the most important part is discussed in a one sentence ambiguity for beginners.
If the bullets are hitting low and need to go up to the bullseye, does one turn the elevation turret clock wise or counter clock wise?
That is how one should answer.
For instance. If I was discussing windbag. I would say:
If the wind is blowing from the left, resulting in bullet impact to the right of the bullseye, one would turn the turret clock wise.
If the wind is blowing from the right with the bullet impact left of the bullseye, one would turn the turret counter clock wise.
The same should be explained for elevation impact.
He quite literally did explain that. Did you read the article at all?
It wasn’t explained!
I agree! Was not explained at all! Examples are neccessary to properly explain this to beginners!
I put a laser in the barrel and align the cross hairs to the laser.
This the best site I have found to help me mount and adjust my new Banner 2 3×9-40 scope. Thanks
Always a pleasure checking in to see what new informative and educational impact (pun very much intended) you’re making on the shooting world. I always try to steer new shooters your way.
I mounted my scope…. I leveled my scope… But when I shot it went too low.
When I went to adjust I’m at the max. I can’t go any lower…. everything seems right as far as scope mounts and leveling….
I had the same problem. My easy fix was that I noticed my 2 base ring mounts were different thickness. The front was thicker that raised the front of scope higher than the rear. Switched the two around which allowed me to get cross hairs on bullseye. It’s worth a look.
These are all good questions to bad no one seems to answer u back
My windage adj. Doesn’t seem to work when I try to adjust left. I’m 8 inches to the right at 100 yards.
I have a new scope that continues to shoot low even though the elevation is st the ‘Max’.
Do I need taller mounts or shorter ones?
You’re moving your elevation(crosshairs) down to match your impact Groupings, not the other way around.
Yes😂
Just kidding
Lower your mount
The question I have is,
After you got your scope zeroed (POS & POI)match up, HOW do you set the numbers on the turrets to zero, once set to zero you would be able to return to the point that your scope is set back to zero.
I don’t know how to set the numbers to “0” .
This shouldn’t be that hard. I’ve been to 3 separate “beginner” scope adjustment URLs. None of them actually explained how to go from a to b. Simple, clear examples are needed. For example, you shoot to the center reticle on the center target and the bullets hit to your right of center, not the target’s right; your right, facing the target. If you “unscrew” the windage turret (counter clockwise)on the right side of the scope, the reticle cross should move toward the bullet holes providing you keep the rifle stationary. Same with elevation. Consider the reticle attached to the “screw” through the turret. If you hit low on the target, “screw in” the elev. turret (clockwise) and that will bring the reticle down to the holes in the target. Now aim at center target, shoot, and repeat till you’re zeroed. Someone else used the screw analogy. Best idea.
Essentially, the “up” and “down” refer to moving your targeting cross/dot up or down, so if your pellet/bullet is hitting too high, you need to move your dot/cross “up” to meet the point of impact, so you use the “up” option on the sight adjustment turret
If you turn the windage “up” you are moving the point of impact up (means you hit the target too low) and that is actually moving the reticle down
You experts are using terminology not familiar with beginners. For us all we need to know is if my bullet is hitting high above the target, do I turn the adjustment clockwise or counterclockwise clockwise to correct this. The same question for if my bullet is missing the target to the right of the bullseye.
I always take a blank sheet of paper and shoot three times and get my group and then from there I will adjust the crosshairs on my scope to point at the group where the majority of the three bullets hit sometimes I do 5 shots, and it’s always best if you have a sandbag or a way to lock your gun in place.
Exactly, basic questions just want basic answers.
Chase the bullet with your reticle. If you’re bullets / pellets are hitting high on the target, turn the top screw in the up direction. Shoot again, if still high, keep chasing by turning up (counterclockwise).
Same practice for left and right (wind age… Screw on the side of the scope)
how to get basic starting setting for malcolm 6x on 1885 40/65 bpcr please reply wade
my brother and i sight a scope at 25 yards for 30.06. once you are on target, shoot at 100 yards you hit 2 inches high and right on at 200 yards. if you raise the scope 2 inches the round will be right on at 300 yds. so at 100 yds aim 4 inches low to be right on. if you have a longer shot aim between the center of the chest to on the top of the back. remington 150 grain core lock. look at ammo ballistic specs and caliber for your rifle.
thank you for adjusting my scopeon my rifle my 3.06.
Come on people. Usually scopes have a up with an arrow. If your shooting low and point of impact needs to go up, you turn the mob in the direction that indicates up. The same for left to right. If point of contact is to the right of your indicated target then you rotate the nob in the direction that points to the left. Simple.
Dear friends,
I am from Sri Lanka Aruna. i am new to air rifle field. I purchase kraal arms model n-11g.p air rifle with Bushnell 3-9x40eg scope. I like to know when i get lower target shoot pellet I should adjust elevation knob left or right and also if my target pellet hit left i should adjust vintage up or down. Thanks.
Regards,
Aruna.
Richard: You did a great step-by-step guide. It was just what I needed.
I found it useful to use two levels simultaneously, one for the rifle and the other for the scope, to get both rifle and scope level in one shot (so to speak).
Great video and thanks again.
Michael
Useful and good, clear photos but — maybe I’m missing something but I’ve looked and looked at this — isn’t an adjustment up made counterclockwise, and down clockwise? Seems to be what indicator says.
Wow, what a good article for your average Joe to follow….like me. I’ve been hunting for 57 years and just get serious about shooting a month before elk season opens (I only hunt elk these days). Doing a new scope on my son’s rifle this weekend. Glad I read your article!